In many real-world scenarios, cloud infrastructure is already in place before adopting infrastructure as code (IaC) solutions like Pulumi. Pulumi provides a feature called import to help manage existing cloud resources within its IaC framework. This feature allows users to import the current state of resources into their Pulumi codebase, making it easier to adopt Pulumi for managing existing infrastructure.
Pulumi Import
Pulumi’s import feature provides a way to bring existing cloud resources under Pulumi’s management. By creating a Pulumi program and using the pulumi import command, users can declare and manage existing infrastructure resources using Pulumi. The pulumi supports both importing existing resources with the CLI and importing existing resources in the code. Here we’re talking about the CLI import to generate the code for the imported resources.
Usage and Syntax
To import an existing cloud resource into Pulumi, you need to follow these steps:
Create a Pulumi Project
Create a new Pulumi project or use an existing Pulumi project where you want to manage the imported resources. For creating a pulumi project, you can check the previous blog post on how to create a new Pulumi project.Identify the Resource to Import
Identify the existing resource in your cloud provider environment that you want to import into Pulumi. This could be a virtual machine, database, storage bucket, or any other supported resource.Apply the Import
Apply the import operation to bring the existing resource under Pulumi’s management. Pulumi will generate the appropriate code for the resource based on its current state in the cloud provider environment.
The syntax for the import command is as follows:
1 | pulumi import <type> <name> <id> |
<type>is the Pulumi type token to use for the imported resource.<name>is the resource name to apply to the resource once it’s imported.<id>is the value to use for the resource lookup in the cloud provider.
Managing Imported Resources
Once the resources are imported, they can be managed just like any other Pulumi-managed resources. The imported resources can be updated, deleted, and included in stacks alongside other Pulumi-declared infrastructure.
Example
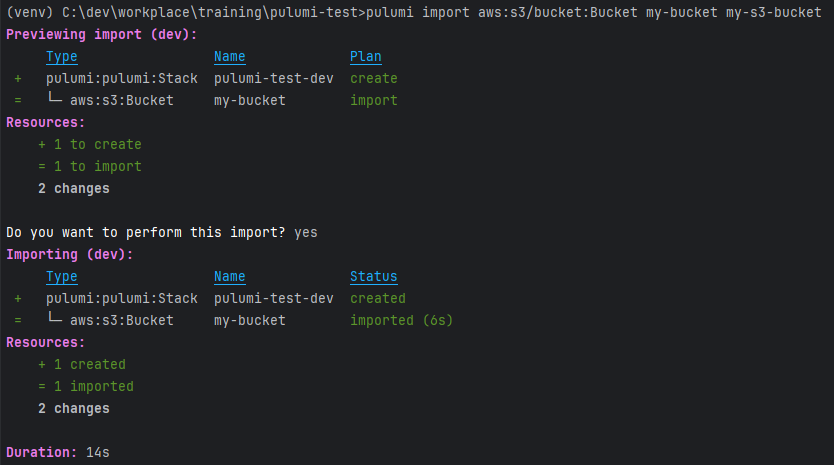
I created a S3 bucket name my-s3-bucket from AWS Console manually. But now I want to manage this S3 bucket by Pulumi. After identifying the bucket to be imported, the import command:
1 | pulumi import aws:s3/bucket:Bucket my-bucket my-s3-bucket |
aws:s3/bucket:Bucketis the Pulumi type token for the S3 bucket resource.my-bucketis the resource name to apply to the imported resource.my-s3-bucketis the value to use for the resource lookup in the AWS provider, here it’s bucket name.
After running the import command, Pulumi will generate the appropriate code for the S3 bucket resource based on its current state in the AWS provider. Below is screenshot of the output of the import command:
And generated code:
1 | import pulumi |
In above code, you will notice there is a protect=True option set for the imported resource. This is to prevent any accidental deletion of the imported resource.
So when you try to delete the imported resource, Pulumi will give the errors to you. Let’s try to delete the imported S3 bucket:
1 | pulumi destroy |
You see, it displays the error message that the S3 bucket is protected and cannot be deleted.
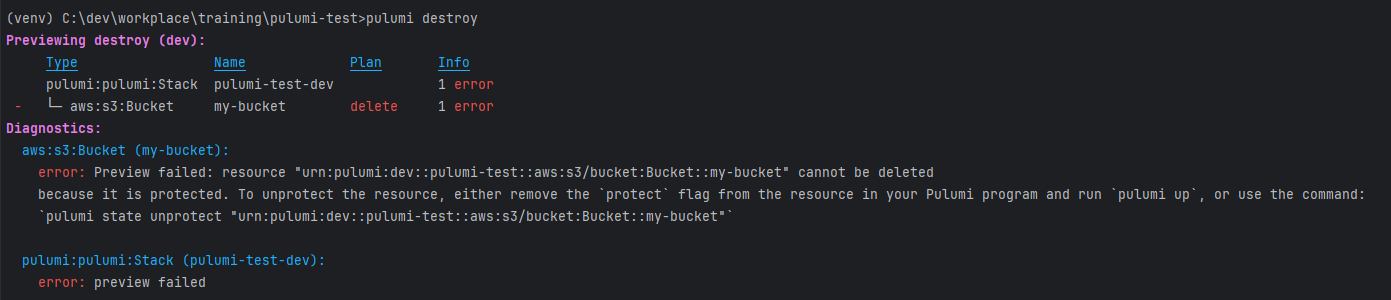
If you want to delete the resource in the cloud provider environment, you can remove the protect=True option from the code or change the protect option to False.
In above we’re using pulumi import to import the s3 bucket resource and code is generated on console. We can also generate the code into python file directly by using below command:
1 | pulumi import aws:s3/bucket:Bucket my-bucket my-s3-bucket -o my-s3-bucket.py |
Pulumi State
Pulumi maintains a state file that tracks the current state of all resources in the cloud provider environment. When a resource is imported, Pulumi updates the state file to reflect the imported resource. This allows Pulumi to manage the imported resource as if it were created in the cloud provider environment.
Sometimes, we want to delete the state which imported in pulumi, but keep the existing cloud resources. In such case, we can use below command to only delete the state and keep the existing cloud resources.
1 | pulumi state delete <urn> |
<urn>is the unique resource identifier of the imported resource.
To check the <urn> of the resource, we can use pulumi stack --show-urns to see the list urns of all resources in the current stack.
1 | pulumi stack --show-urns |
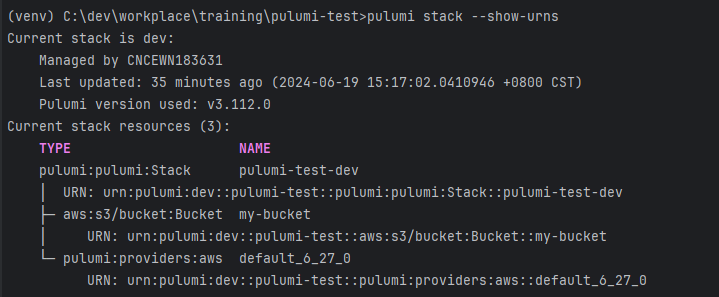
In above screenshot, we can see the <urn> of the imported S3 bucket resource.To delete the state of the imported resource, we can use the following command:
1 | pulumi state delete urn:pulumi:dev::pulumi-test::aws:s3/bucket:Bucket::my-bucket --force -y |

After deleting the state, the imported S3 bucket will still exist in the cloud provider environment.
Conclusion
Pulumi’s import feature allows users to seamlessly integrate existing cloud resources into their Pulumi programs. By following the import process and syntax, users can effectively manage their entire infrastructure, including existing resources, through Pulumi’s IaC approach.
This feature simplifies the transition to Pulumi for managing infrastructure and enables teams to leverage the benefits of IaC without having to recreate their entire cloud environment from scratch.
Reference Links
- Pulumi Import: https://www.pulumi.com/docs/cli/commands/pulumi_import/
- S3 Bucket Import: https://www.pulumi.com/registry/packages/aws/api-docs/s3/bucket/#import

