In AWS Cloud, copying objects between buckets within an AWS account is a standard, simple process for S3 users. To copy AWS S3 objects from one bucket to another bucket, you can use the AWS CLI. In its simplest form, the following command copies all objects from bucket1 to bucket2:
1 | aws s3 cp s3://bucket1 s3://bucket2 |
To copy a single object, use the following command:
1 | aws s3 cp s3://bucket1/key1 s3://bucket2/key1 |
To copy a directory, use the following command:
1 | aws s3 cp s3://bucket1/key1/ s3://bucket2/key1/ --recursive |
All commands about S3 copying objects are available in the AWS CLI documentation. You can reference this doc https://docs.aws.amazon.com/cli/latest/reference/s3/cp.html.
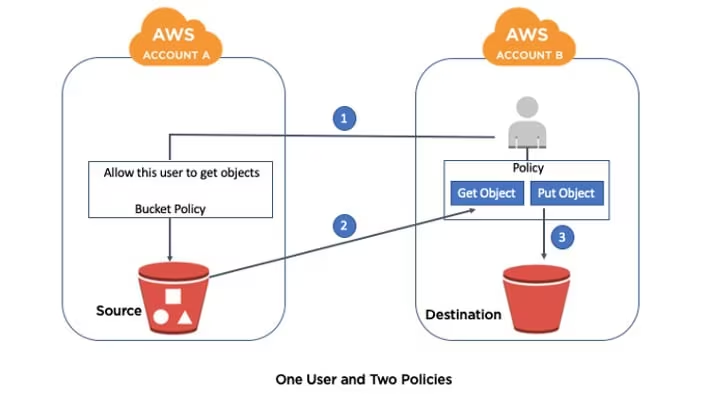
But there are some cases where you need to copy objects between accounts instead of within an account. In this blog, we will talk about how to copy objects between AWS accounts using AWS CLI.
Pre-Requirements
Two AWS accounts: Two AWS account entities with their account IDs, one is source account and another is destination account.
Source and destination buckets: One source account, needs a bucket with objects. The another destination account, will need a bucket that will receive the source account’s objects.
IAM user: This AWS IAM user in the destination account will be responsible for copying the objects.
Permissions: The IAM user needs permissions to access both buckets in order to get objects from the source bucket and put objects in the destination bucket. These permissions are granted with the use of policies.
Steps
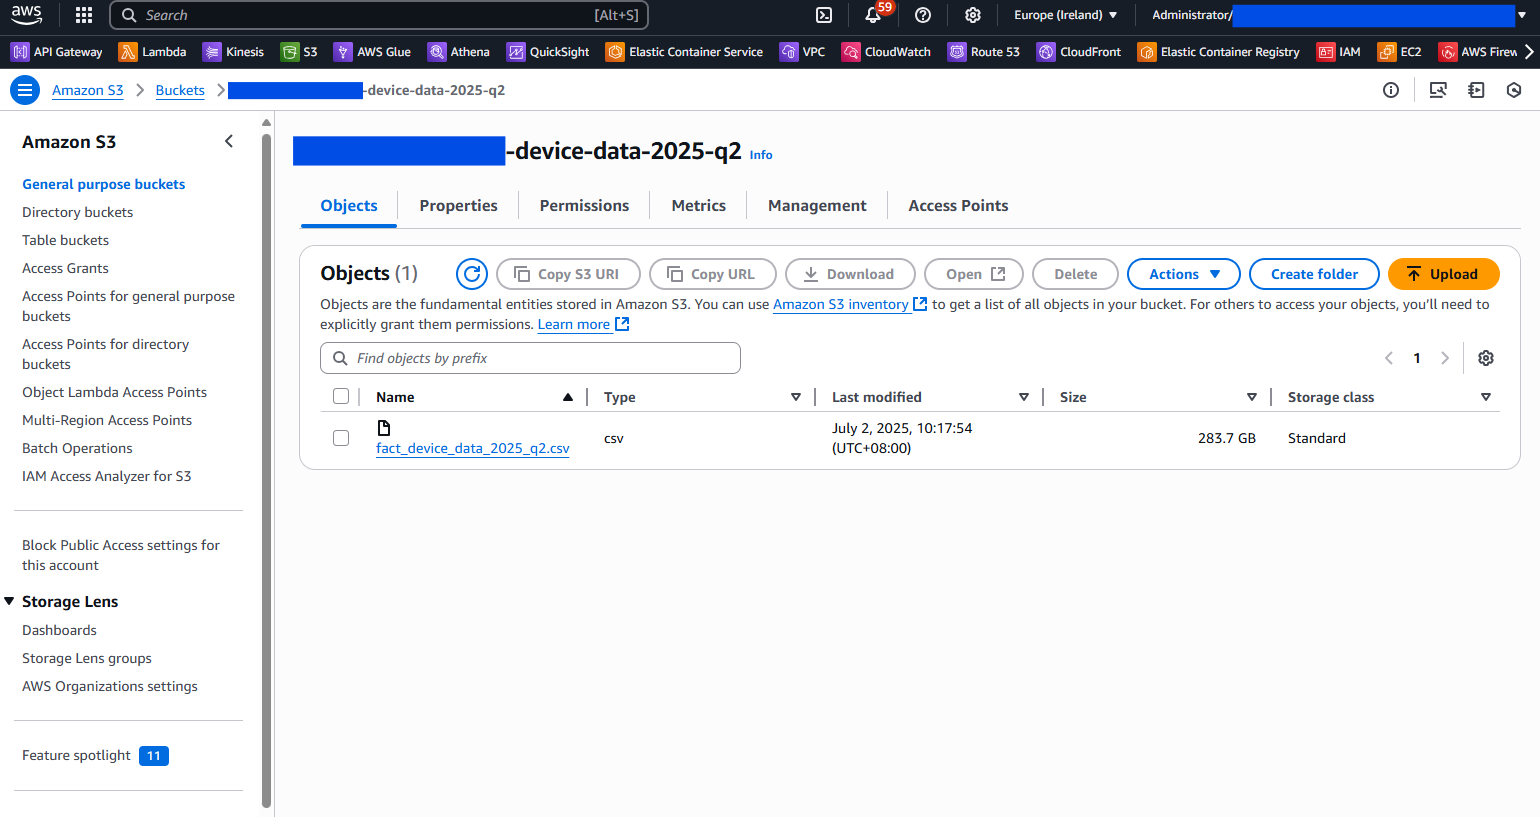
We already have two AWS accounts, source account and destination account. We also have a source bucket and a destination bucket, and one object file which size around 284GB in source account. We need to copy this object file from the source bucket to the destination bucket.
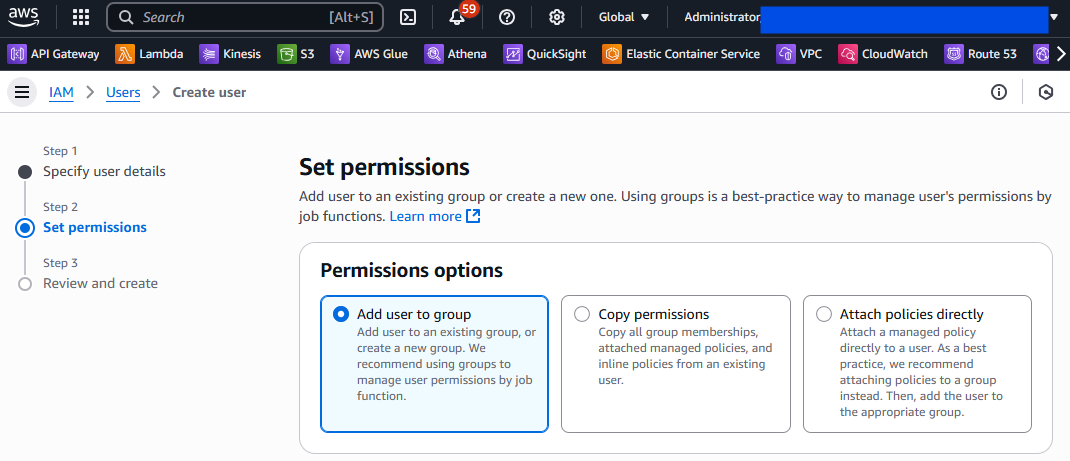
Step 1: Create an IAM user in the destination account
Go to AWS Console menu and select IAM service. Then select Users from the left menu. Click on Add user button.
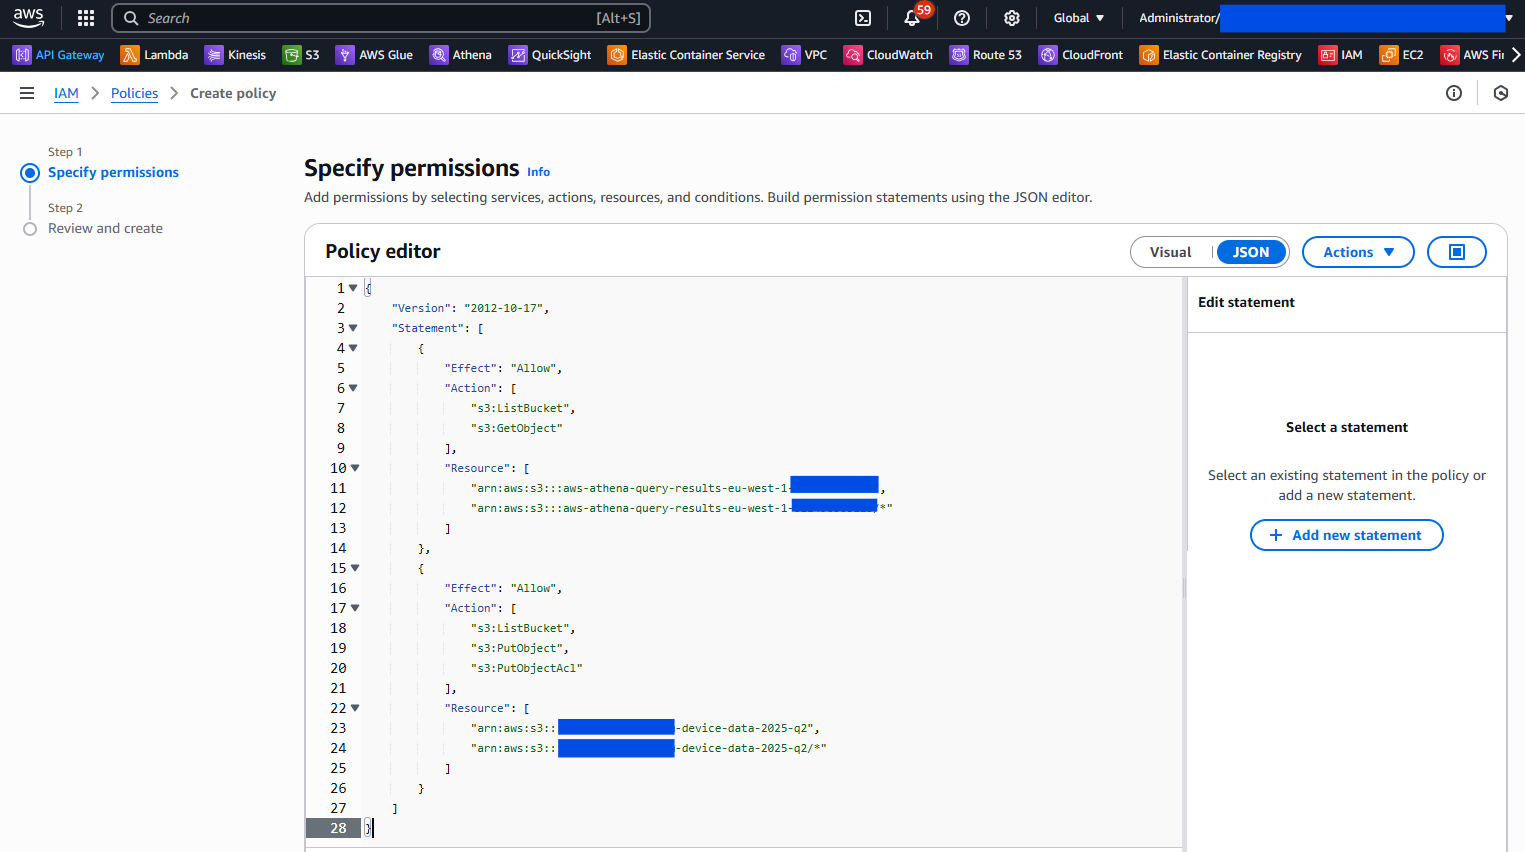
Step 2: Create a Policy in the destination account
Go to IAM console menu and select Policies from the left menu. Click on Create policy button. Switch to Json edit mode in policy editor. Following below policy json in the policy editor, and using your own source and destination bucket name in the resource section. Let’s named this policy as “allow-cross-copy-data”.
Below policy allows the IAM user to list and get objects from the source bucket and put objects in the destination bucket.
1 | { |
Step 3: Attach the policy to the IAM user
Go to IAM console menu and select Users from the left menu. Select the IAM user which we created in the destination account. Click on Attach policies button. Attach the “allow-cross-copy-data” policy to the IAM user.
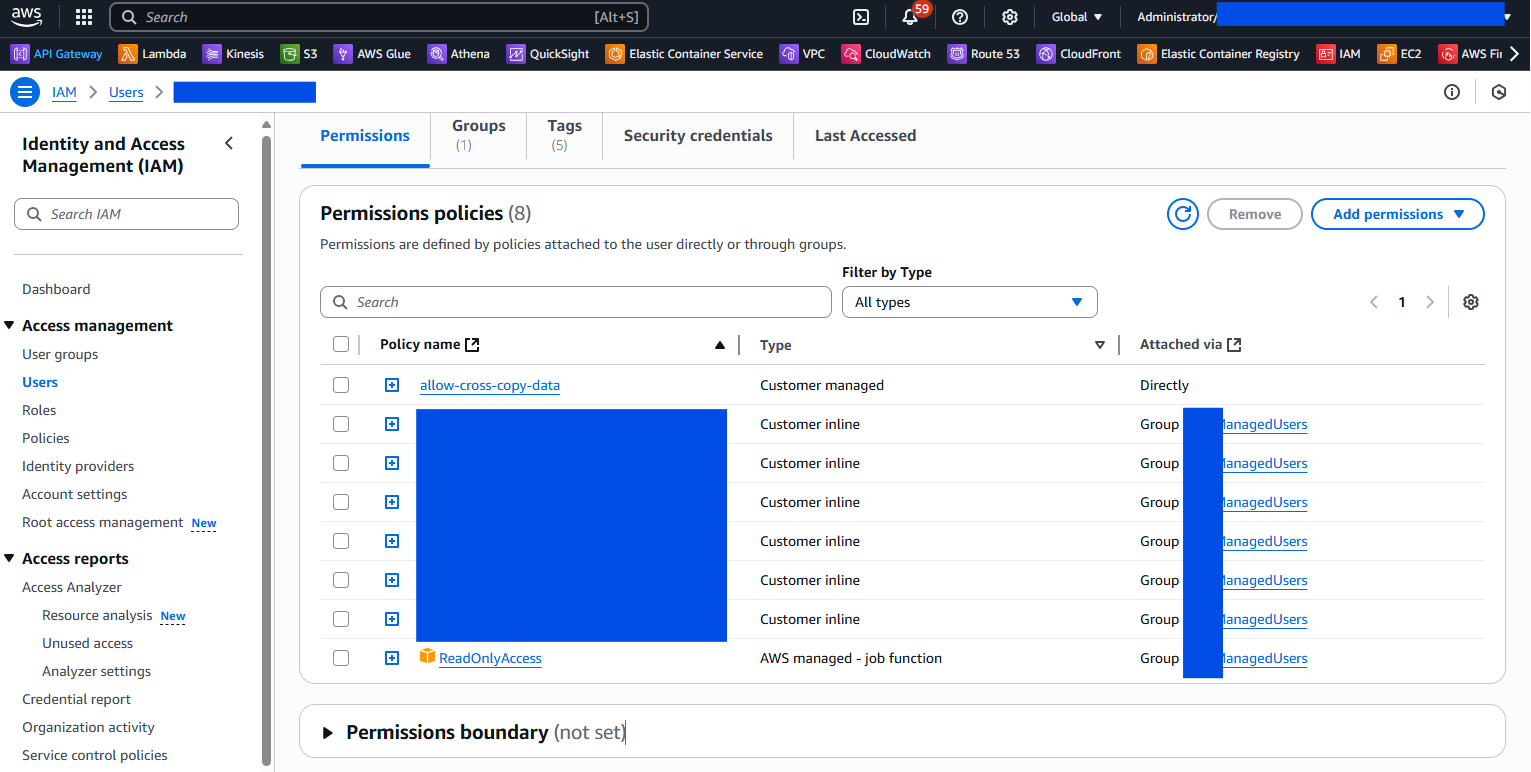
Once you attached the policy to the IAM user, you can see the policy attached to the user. Then you can create an AKSK pair (Access Key ID and Secret Access Key) for the IAM user. The AKSK pair will be used to access the source and destination buckets in AWS CLI.
Step 4: Install & Configure AWS CLI
To Install AWS CLI on your machine, follow this official documentation https://docs.aws.amazon.com/cli/latest/userguide/getting-started-install.html.
Once you have installed the AWS CLI, configure it with your AWS Access Key ID and Secret Access Key.
In Windows you can set the keys as follows:
1 | SET AWS_ACCESS_KEY_ID=<aws_access_key_id> |
In Linux/Unix machines or Mac, you can set the keys as follows:
1 | export AWS_ACCESS_KEY_ID=<aws_access_key_id> |
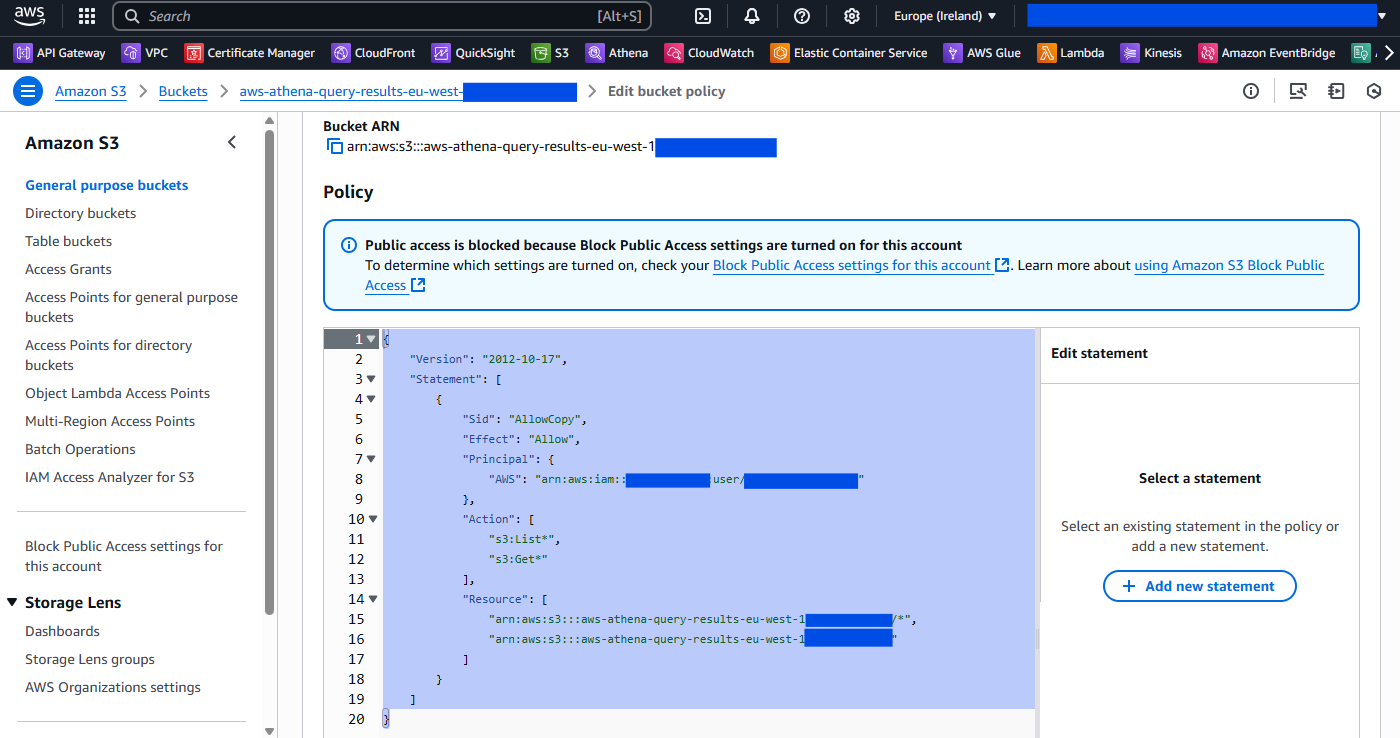
Step 5: Create bucket policy for source bucket
In the source account, we need to create a bucket policy for the source bucket. The bucket policy will allow the IAM user of destination account to access the source bucket. The following bucket policy allows the IAM user to access the source bucket.
1 | { |
Step 6: Copy the object from source to destination bucket
Now, we can copy the object from source to destination bucket using the AWS CLI. Use the following command to copy the object:
1 | aws s3 cp s3://<source-account-bucket>/<object-key> s3://<destination-account-bucket>/<object-key> |
Below are screenshots of the AWS CLI commands and output.

In above screenshot, you will see the command used to copy the object from source account bucket to destination account bucket. The output shows the progress of the copy operation. Once the copy operation is complete, you will see the object copied successfully.
That’s all. You have successfully copied the object from source account to destination account using AWS CLI. Hope this can help you.

