In the world of AI, creating systems that can autonomously perform tasks and make decisions is a fascinating challenge. LangGraph, a framework designed for building AI agents, provides a powerful way to create such systems. In this blog post, we will explore how to use LangGraph to create an AI agentic system.
What is LangGraph?
LangGraph is a framework that allows developers to create AI agents by defining their behavior using a graph-based approach. This enables the creation of complex decision-making processes and interactions between different components of the system.
LangGraph is introduced by LangChain. With LangGraph you can create highly controllable agents, include both single agent and multi-agents.
LangGraph models agent workflow as a directed acyclic graph (DAG), where nodes represent tasks or actions, and edges represent the dependencies between them.
LangGraph key components.
State: A shared data structure that represents the current snapshot of your application. It can be any data type, but is typically defined using a shared state schema
Nodes: Functions that encode the logic of your agents. They receive the current state as input, perform some computation or side-effect, and return an updated state.
Edges: Functions that determine which Node to execute next based on the current state. They can be conditional branches or fixed transitions.
Graph: The overall structure that connects Nodes and Edges, defining the flow of execution.
Let’s Build an AI Agent
Assume our company has a offline shop, and the customers often ask the same question about the shop open-closed time. We want to build an AI agent that can handle these inquiries efficiently.
OK,let start to build this AI Agent system. Create a directoy called “langgraph-agent-sample”. And create a Python virtual environment in this directory.
1 | mkdir langgraph-agent-sample |
and activate the virtual environment, the bat file activate.bat will be created in the venv/Scripts directory. the shell file activate will be created in the venv/bin directory base on your operating system.
Next, we need to install the required packages. Create a requirements.txt file with the following content.
1 | langgraph |
The langgraph package provides the core functionality for building graph-based AI agents, while langchain_openai integrates with Azure OpenAI services.
Then, install the packages using pip:
1 | pip install -r requirements.txt |
Next, we need to create a Python script to define our agent’s behavior. Create a file named agent.py in the langgraph-agent-sample directory.
1 | import os |
In above code, we use Azure OpenAI model gpt-4o and LangGraph to create an AI agent capable of understanding and responding to user queries about shop hours. Create two tools: shop_opening_hours and current_time, which provide the shop’s opening hours and the current time, respectively. The current_time tool can be used to get the current time and check if the shop is open or closed, and also it is a reference to ask the ai about any other future time.
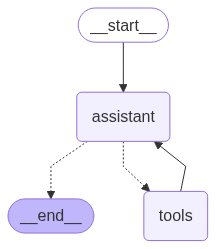
You can see the LangGraph framework in action as it manages the flow of information between the user, the assistant, and the various tools at our disposal.
The StateGraph is responsible for defining the various states and transitions that our agent can take. It allows us to easily add new tools and modify the behavior of the agent without having to rewrite large portions of code.
We can use below snip code to show the graph:
1 | # Display graph image in a window |
Lets’ run it. execution below scripts:
1 | python agent.py |
Below is agent running screenshot:

This is simple AI Agent to use LangGraph to build. In tools, you can also write more complex logic to handle various scenarios and improve the agent’s capabilities. Such like invoke service API, access databases, or integrate with other systems.
Conclusion
LangGraph provides a powerful framework for building AI agentic systems. By leveraging its graph-based approach, developers can create agents that are capable of complex decision-making and autonomous behavior. As AI continues to evolve, tools like LangGraph will play a crucial role in shaping the future of intelligent systems.

